lunes, 29 de marzo de 2021
sábado, 13 de marzo de 2021

viernes, 25 de diciembre de 2020
Convertir Autos a GTA SA
1.- Importar a 3dsmax
2.- Texturizar
3.- Importar base de otro auto base
4.- Encajar con auto base
5.- Exportar en formato obj
prim,
sec,
vehiclegrunge256 [prim,env:9,spec]
domingo, 1 de noviembre de 2020
viernes, 2 de octubre de 2020
Importación y exportación de partes del cuerpo del jugador GTA SA en 3dsMax


domingo, 20 de septiembre de 2020
How to create skins for gta sa
Run 3ds max and click on import...

Click on all files

Select the model you want to convert and click open (in my case, a.3ds)

You have the model imported!

Now press M on your Keyboard, you'll see this new window

Take the textur file from your model

drag and drop it on the first square

Repeat untill you get all the textures file from yout model on those squares

click on the + (on the left side of editable mesh) and select element

scroll down util u see the Material tab!

click on the that space and select the first option

Now click on the square which you droped the texture from that part of the body,after that,
click on assign...

repeat it untill you get our model completely textured

click on Element again, to leave this tab

click on utilities tab, scroll up and click on the letter A,click on import DFF next

On that new window, select DFF file from a Original ped and click open

Now you have 2 models, the one you want to convert(textured) and the one from san andres with bones

Now move your model to the same position of the SA Model In my case, the model is smaller than the original one from sA,
so i need to resize it to fit it

Now it's on the same position but the arms are out of place

SO, select the arm's bone from SA original ped

and rotate it ultill you get it on the same position!

Now it's "perfect"

Select sA model ped and click on the utilities tab,dff io, select "skip Col" and click on Bone/skin export

Select any name you want to save the dff, i chose test

Now delet the original ped mesh

Select the bones and delet them all

You see only your model, go to utilities tab again, click on Dff io,click on A again and import dff

select the file you created before

Now you see the model you want to convert and the original one from san andreas but in this time, it's on the same position!

Select SA original model, click on + (on the left side of editable mesh)

click on vertex and you get this warning message, click on yes

Now you see many blue dots

Press Crtl+A on your keyboard to select all of those dots and they turn red.

Scroll until you see "Attach" and click on

Now click into your model and this window appears,select the first option and click ok

now you see many dots, red and blue.

Press delete on your keyboard and the red dots are gone!

Click on vertex again to leave this option.
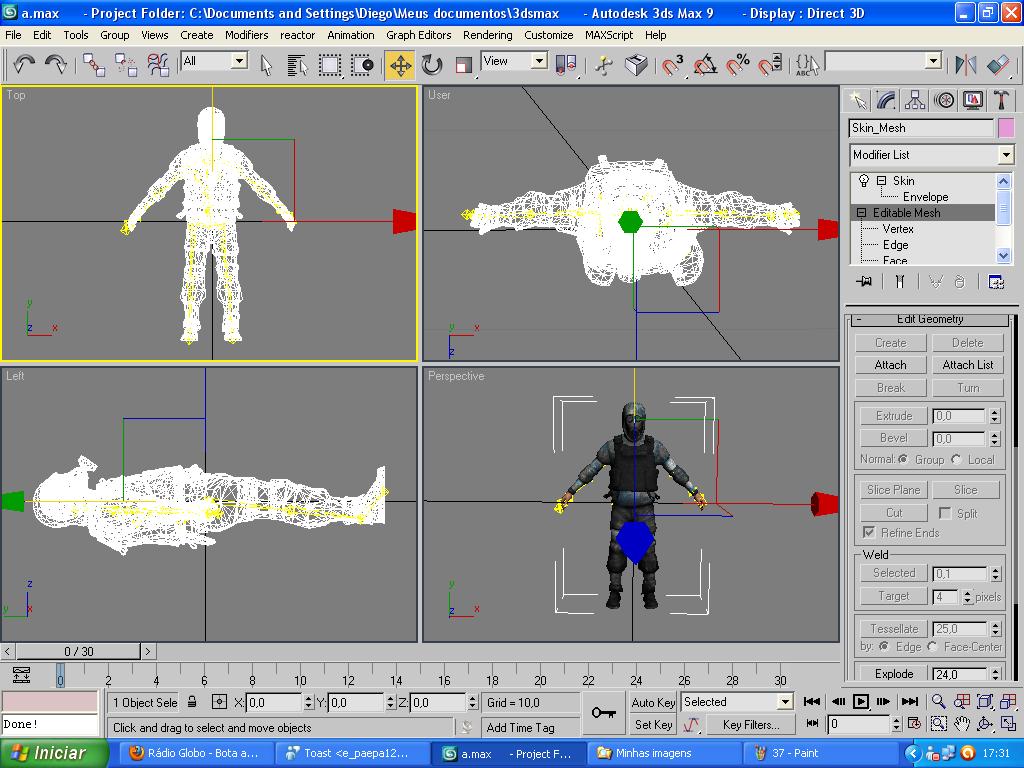
Now you have successfully rigged your ped but probably, it will have some bugs. Lets check it, Select the arm's bone:

now rotate it, and you see some bugs on the body

Select your mesh, click on +(on the left side of SKIN) than click on Envelope and Select "Vertices"

in my case the bug is located on the chest so i select spine 1. You select the part of you model which you see thebugs!

Scroll down and you see "Weight Properties"

Now select the dots that you saw the bugs

after that, select rigid and type 1,0 on Abs Effect

repeat it on others parts of the model select the spots

and do it again, (select rigid and type 1,0 on Abs Effect)

On the Top of the window,Click on SKin again and you got it deselected.

now select the bone again and rotate to see the result

you got it fixed, without bugs!
SO click on utilities tab again, Dff io, now select Skip col and click on Bone/skin Export

Now get one txd file, and import your textures, don't forget to rename
it to the exaclty name that you used before import them into 3dsmax!
